

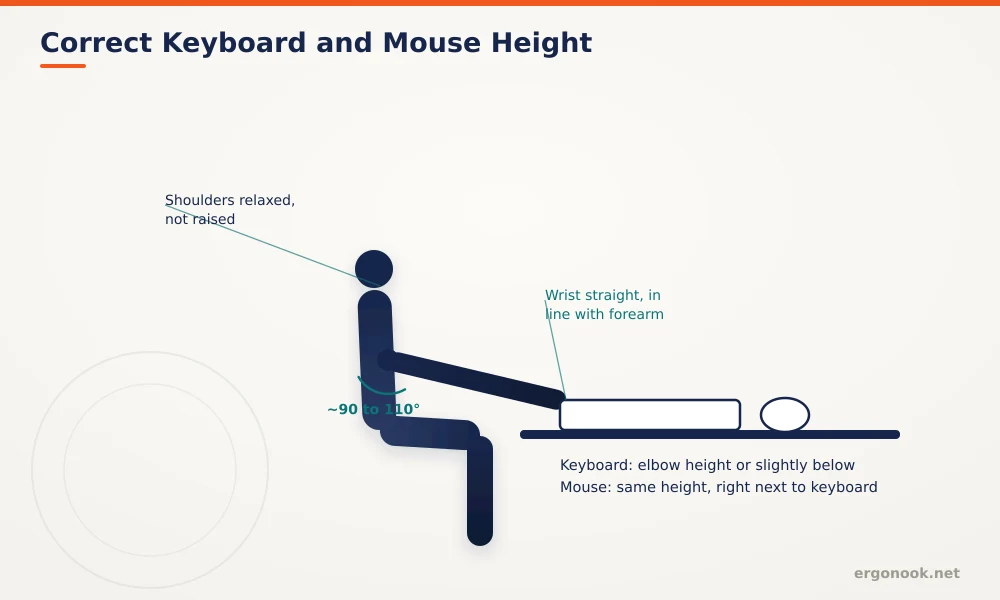
To position your keyboard and mouse ergonomically, keep your elbows close to your body at roughly 90 to 110 degrees, wrists straight in line with your forearms, and the mouse right next to the keyboard at the same height. OSHA’s Computer Workstations eTool and Cornell’s CUErgo lab both point to the same setup: keyboard at or just below elbow height, mouse within easy reach.
- Elbow angle should sit at or above 90 degrees, per Cornell’s CUErgo guidelines, which helps avoid nerve compression at the elbow.
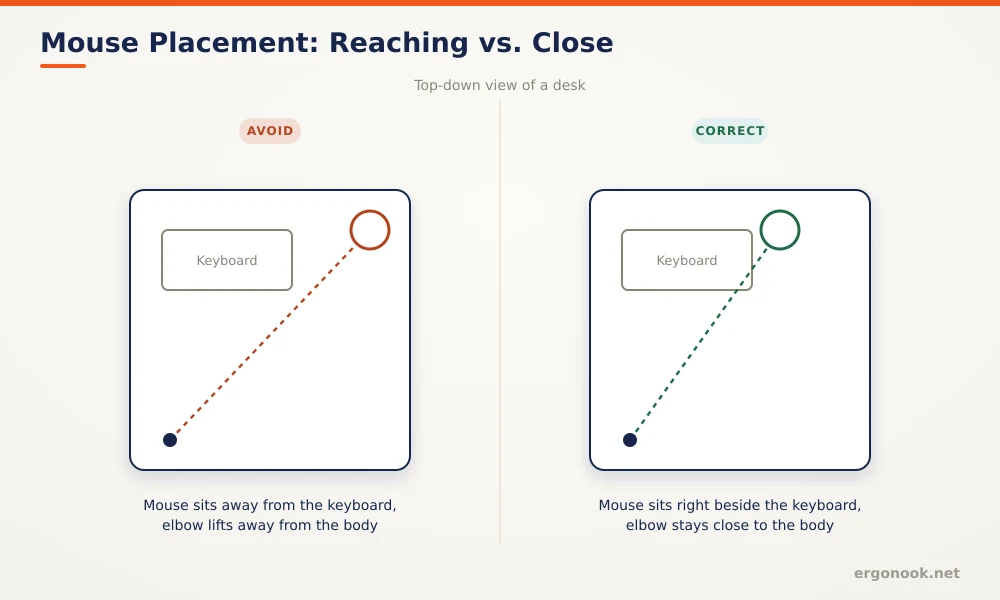
- OSHA recommends keeping the mouse close to the keyboard. A gap of even a few inches forces repeated reaching that loads the shoulder over a workday.
- A negative-tilt keyboard tray, sloped slightly down and away from you, is what Cornell’s CUErgo lab calls the setup that keeps wrists closest to neutral.
- Wrists should stay straight, not bent up, down, or to either side, whether you’re typing or clicking.
In this article:
- Getting your elbow angle right
- How to set keyboard height
- Where the mouse should sit
- What a negative-tilt tray does
- Quick positioning checklist
- Common mistakes to fix
- Frequently asked questions
Getting Your Elbow Angle Right
Your elbow angle, the bend between your upper arm and forearm, should sit at or slightly greater than 90 degrees. Cornell’s CUErgo lab flags this as the number that matters most for avoiding nerve compression at the elbow, a common source of tingling in the ring and little fingers for people who rest their forearms on a hard edge for hours (Cornell CUErgo, Computer Workstation Ergonomics Guidelines). If your chair or desk forces your elbows wider than about 110 degrees, your keyboard is probably too low. Narrower than 90, and it’s too high.
How to Set Keyboard Height
OSHA’s guidance is direct on this: put the keyboard directly in front of you with your shoulders relaxed and elbows close to your body, wrists straight and in line with your forearms (OSHA, Computer Workstations eTool, Keyboards). In practice that means the keyboard’s home row should sit at or just below your seated elbow height. If you set your desk height first using our correct desk height guide, the keyboard should need little or no extra adjustment once it’s on the desk. A keyboard that’s too low makes you bend your wrists upward to reach the keys, which OSHA calls out as a direct cause of tendon strain.
Where the Mouse Should Sit
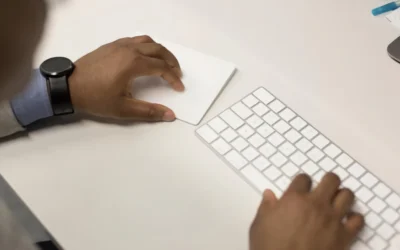
Keep the mouse right next to the keyboard, at the same height, not off to the side on a separate surface. OSHA notes that when the mouse isn’t near the keyboard, you’re more likely to end up in awkward postures or forceful hand positions, and that stress compounds over a full workday (OSHA, Computer Workstations eTool, Pointer/Mouse). Cornell’s research on keyboard and mouse placement adds a specific detail worth acting on: the mouse should sit close to the side of your body, above the keyboard tray if you use one, so your upper arm and elbow stay relaxed instead of reaching sideways (Cornell CUErgo, Effect of Keyboard and Mouse Placement on Shoulder Muscle Activity).
What a Negative-Tilt Tray Does
A standard desk surface is flat, which tends to push your wrists up into extension as you type. A height-adjustable keyboard tray with a negative tilt, meaning it slopes down and away from you rather than up, lets the keyboard sit below elbow height while keeping the keys accessible in a neutral wrist posture. Cornell’s CUErgo lab describes this combination, a lower tray with a slight downward slope, as the setup most likely to keep wrists neutral through a full day of typing (Cornell CUErgo, Computer Workstation Ergonomics Guidelines). You don’t need an extreme slope to get the benefit. A shallow downward angle, adjusted so your wrists feel straight rather than cocked upward, is enough. If you’re shopping for a tray, our guide to keyboard trays for standing desks covers models with this adjustment built in.
Quick Positioning Checklist
Run through this before you settle in for a long work session:
- Sit back in your chair with your back supported, not perched on the edge.
- Drop your shoulders and let your elbows rest close to your sides.
- Check the elbow angle. It should read at or slightly more than 90 degrees.
- Rest your wrists straight on the keyboard’s home row without bending up or down.
- Slide the mouse right next to the keyboard, same surface height, no reaching.
- Try it for ten minutes. If your wrists feel cocked upward, lower the keyboard or add negative tilt.
| Body Part | Correct Position | Common Mistake |
|---|---|---|
| Elbows | 90 to 110 degrees, close to the body | Flared out, reaching for a mouse set too far away |
| Wrists | Straight, in line with the forearm | Bent up because the keyboard sits above elbow height |
| Shoulders | Relaxed and level | Raised toward the ears from a desk that’s too high |
| Keyboard | At or just below elbow height | Placed on a desk sized for writing, not typing |
| Mouse | Same height, right beside the keyboard | Set on a separate surface a few inches away |
Common Mistakes to Fix
The most common setup problem isn’t the keyboard itself, it’s the desk underneath it. Standard desks are built around 29 to 30 inches high, a number set for handwriting, not for keeping wrists neutral while typing. If you’re tall or short for that fixed height, no amount of chair adjustment fully fixes the mismatch. That’s the exact problem a height-adjustable keyboard tray solves, since it decouples keyboard height from desk height. The second common mistake is resting your wrists on a hard edge or wrist rest while actively typing. A wrist rest is meant to support your wrists during pauses, not to be a pivot point you type over, since that bends the wrist upward at the exact angle you’re trying to avoid. Once your keyboard and mouse are dialed in, check your monitor height too. A screen set too low undoes some of the benefit by pulling your head and shoulders forward again.
Frequently Asked Questions
Should my keyboard and mouse be at the exact same height?
Yes. Keeping them level keeps your wrist at the same angle when you move between typing and clicking, instead of dropping or lifting your hand each time you switch.
What if my desk is too high for a good keyboard position?
Add a height-adjustable, negative-tilt keyboard tray under the desk. It lets you drop the keyboard below desk height without changing the desk itself.
Is a wrist rest necessary?
Not required, but useful during pauses. Avoid resting your wrists on it while actively typing, since that bends the wrist upward instead of keeping it straight.
Can I get good positioning with a laptop keyboard?
Rarely on the laptop’s built-in keyboard alone, since the screen and keys are fixed together. An external keyboard and mouse, with the laptop raised on a stand, gets much closer to a correct setup.
Good keyboard and mouse positioning comes down to a short list: elbows near 90 to 110 degrees and close to your body, wrists straight, keyboard at or below elbow height, and the mouse right beside it. Get the desk and tray height right first, and the rest tends to fall into place.




Write Your Review
No reviews yet. Be the first to share your experience!