

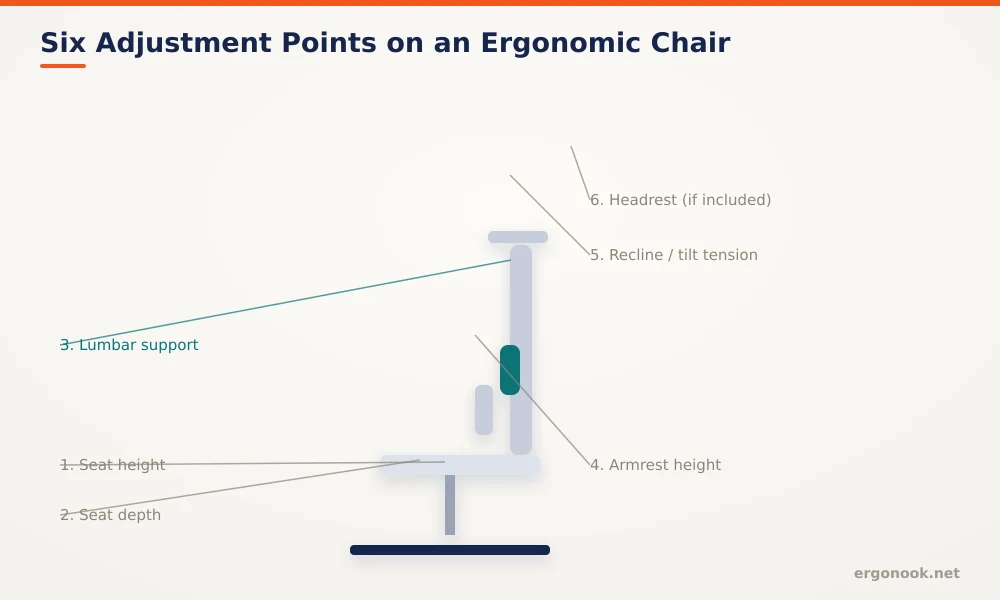
To adjust an ergonomic office chair, set seat height first, then seat depth, lumbar support, armrests, and recline tension, in that order. Cornell’s ergonomics program lists these as the essential adjustments on a task chair. Aim for a 2 to 3 finger-width gap behind your knee at the seat edge, a widely cited seat depth benchmark.
- Cornell University’s ergonomics program identifies six essential chair adjustments: seat height, seat depth, lumbar support, armrest height, recline, and tilt tension.
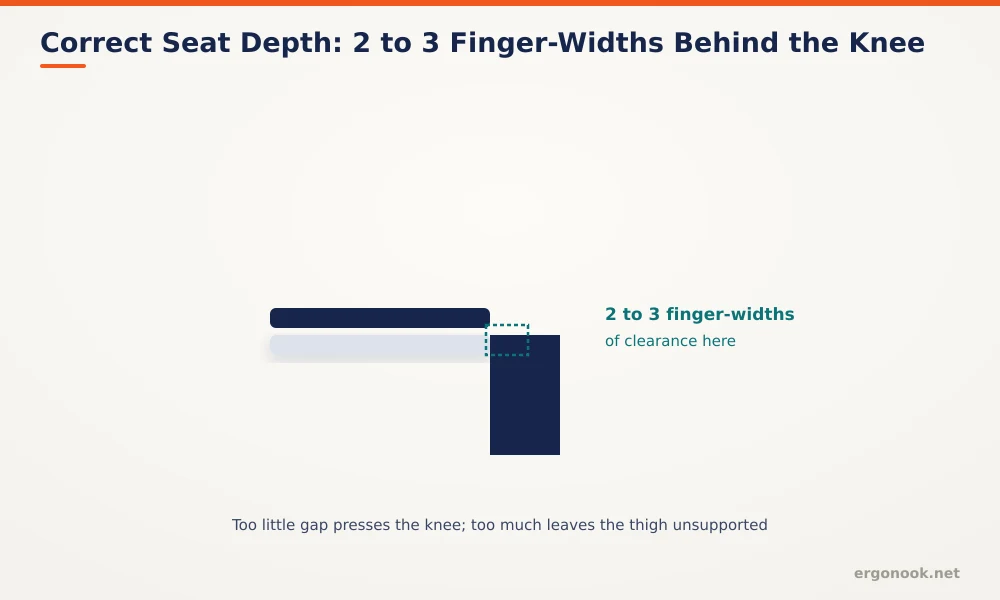
- Correct seat depth leaves a 2 to 3 finger-width gap between the front edge of the seat and the back of your knee.
- Armrests set too high force your shoulders to shrug; set too low, they leave your forearms unsupported and your shoulders do the work instead.
- A chair locked in one fixed position discourages the small position changes your spine needs through the day. Tilt tension should let you move, not just recline once and stay still.
In this article:
- The quick answer: six adjustment points
- Why adjusting your chair correctly matters
- How to adjust each part of the chair
- Special cases
- Signs your chair is still adjusted wrong
- Frequently asked questions
The Quick Answer: Six Adjustment Points
| Adjustment | Target |
|---|---|
| Seat height | Feet flat, knees near 90 degrees |
| Seat depth | 2 to 3 finger-widths between seat edge and back of knee |
| Lumbar support | Sits at the inward curve of your lower back, not above or below it |
| Armrest height | Elbows at 90 degrees, shoulders relaxed, light contact only |
| Recline / tilt tension | Loose enough to move, firm enough to feel supported reclined |
Why Adjusting Your Chair Correctly Matters
An expensive ergonomic chair left at its factory settings often performs worse than a basic chair adjusted correctly, since none of its adjustable features are doing anything if they’re not actually set to fit your body. Cornell’s ergonomics program lists seat height, seat depth, lumbar, armrests, recline, and tilt tension as the essential adjustments on a task chair (Cornell University Ergonomics). Skipping any one of them tends to shift the problem somewhere else in your body. Get the seat height wrong and your knees or feet compensate. Skip lumbar support and your lower back rounds to fill the gap.
How to Adjust Each Part of the Chair
Work through these in order, since later adjustments depend on the earlier ones being correct first.
1. Set Seat Height First
Sit with your feet flat on the floor and check that your knees sit at roughly a 90 degree angle, level with or slightly below your hips. This is the foundation adjustment. Everything else on the chair is measured relative to this position, so setting it last would mean redoing the rest.
2. Set Seat Depth
Slide the seat pan, or scoot back on chairs without that adjustment, until there’s a gap of about 2 to 3 finger-widths between the front edge of the seat and the back of your knee. Too little gap presses into the sensitive area behind the knee, restricting circulation. Too much gap leaves your thighs unsupported and encourages you to slide forward, away from the backrest.
3. Position Lumbar Support
Adjust the lumbar support’s height and depth so it meets the inward curve of your lower back, just above your belt line. Too little support lets your back round into a slouch. Too much pushes your spine into an exaggerated arch, which creates its own strain over a full workday.
4. Set Armrest Height
With your shoulders relaxed and elbows bent near 90 degrees while typing, the armrests should make light contact with your forearms, not bear significant weight. Armrests set too high push your shoulders up toward your ears. Set too low, they do nothing, and your shoulders end up supporting your arms instead.
5. Adjust Recline and Tilt Tension
Tilt tension controls how much force it takes to recline. Set it too loose and the backrest feels unsupported when you lean back. Set it too tight and you’ll avoid reclining at all, which defeats the purpose. Frequent small position changes matter for spinal health, so the goal is a tension that lets you move through the day rather than locking you into one fixed angle.
Headrests, when a chair has one, are the adjustment people skip most often, mostly because they only matter during recline. Set too low, it pushes your head forward when you lean back. Set too high, it does nothing at all. The quickest way to find the right spot is to recline fully first, then adjust the headrest to meet the back of your head at that angle, rather than trying to guess the position while sitting upright.
Special Cases
Taller and heavier users often need a chair rated for their frame before any of these adjustments can work correctly, since a standard-size chair may not have enough seat depth range or a high enough weight rating to begin with. Our big and tall office chair roundup covers models with the extra range these adjustments actually need. Shorter users often run into the opposite problem, where seat height can’t go low enough to keep feet flat even at its lowest setting, in which case a footrest closes that gap without forcing an uncomfortably shallow seat depth as a workaround.
Signs Your Chair Is Still Adjusted Wrong
Pins-and-needles or numbness behind the knees points to a seat depth that’s too long. Shoulder tension by mid-afternoon usually traces back to armrests set too high or too low. Lower back fatigue that builds through the day, even in a chair with lumbar support, often means the lumbar isn’t actually meeting the curve of your spine, either too high, too low, or not pushed forward enough to make contact.
Frequently Asked Questions
What if my chair has no lumbar adjustment?
A separate lumbar cushion can help temporarily, but it’s a workaround, not a substitute for a chair with properly shaped, adjustable support built in.
Does the order of adjustments actually matter?
Yes. Seat height changes your knee and hip angle, which affects where seat depth and lumbar support end up landing, so setting height first avoids redoing the other adjustments.
Should I remove armrests if they can’t be adjusted right?
If fixed armrests sit too high and can’t be lowered, removing them is often better than letting them push your shoulders up all day.
How often should I re-check these adjustments?
Whenever your chair, desk, or footwear changes meaningfully, and it’s worth a quick recheck every few months even without a change, since small drifts in habit are easy to miss day to day.
An ergonomic chair only works if it’s actually adjusted to your body. Work through seat height, seat depth, lumbar, armrests, and tilt tension in that order, and recheck them whenever something about your setup changes.





Write Your Review
No reviews yet. Be the first to share your experience!